Have you ever wanted a platform on which you could build your application, deploy it, and see it work on all devices? For many this is a dream that would require quite a bit of effort- money, time, etc- to achieve.

A number of technologies exist today to help a developer build mobile applications, but it seems that these applications need to stack up on top of other classical existing options which results in maintaining two separate codes, a higher cost of ownership and lots of costly upgrades. One of the solutions that addresses the above issues and provides a more comprehensive and managed approach to building mobile apps that work for both classical desktop devices as well as tablets and cell phones is Magentrix!
Magentrix Sites for Salesforce allows you to import Salesforce objects and build mobile applications or sites that are fully integrated with Salesforce. The approach is very much aligned with a Cloud delivery model where you build your application on the cloud and run it with no deployment steps necessary. By doing this, you can focus on building your application rather than worrying about adaptability, security, scalability, compatibility or even the fact that your code may be aging and getting obsolete as the technology evolves. This is because of the abstraction layer that the Magentrix cloud development platform provides.
If you like MVC development models, you are going to love this! Let's jump into an example and explore how this is done.
In this example, I am going to build a feedback form which gets the user's information and records it in Salesforce. We can also set up workflows that let the necessary people know within the organization that someone provided feedback.
Naturally we start in Salesforce by creating our feedback__c object. Then we add First Name, Last Name, Email and Message fields to this object. The next step is to get into Magentrix for Salesforce instance and log in! That's easy enough. Once you set up the integration that links Magentrix to your Salesforce.com organization instance, you can proceed with importing the Feedback__c object.
I would go to the Salesforce connector area in Magentrix and import our new Feedback object:

Next, I go ahead and set the security up for portal users so that the access to the data is secured within Magentrix:

Now we're set to proceed to the next step, building our mobile feedback app! Even though at this point I could just turn to Magentrix's drag and drop layout designer to create my form and publish it without any coding required, I will switch gears and do a custom UI for this example.
I start with creating a custom Active Page that allows me to build our app there:

My coding effort will be focused on two areas, as is the case in most of today's modern MVC development platforms:
The view here is the page I have created, and by clicking on "Add Custom Controller" I can add a controller class where I can write the logic, which will be very minimal in this case.
To begin, I will first show the controller code. By default any Active Page Controller has a GET method called "Index". This method is called when user browses "/aspx/feedback". Here is what I put there:
[SerializeViewData]
public class FeedbackController : AspxController
{
public override ActionResponse Index()
{
//make a new instance of the feedback object (all sfdc objects are prefixed in Magentrix).
Force__Feedback__c feedback = new Force__Feedback__c();
//send the model to the view
return View(feedback);
}
[HttpPost]
public ActionResponse Index(Force__Feedback__c feedback)
{
//creates the feedback record in SFDC
bool isSccess = Create(feedback);
if (isSccess)
DataBag.ShowConfirmation = true;
//returns the model back to the view
return View(feedback);
}
}
In the above I have an additional action method that is decorated as "HttpPost" which tells Magentrix that this action is triggered via "HTTP POST". Also the action defines the Feedback object as its input parameter, this definition asks the Magentrix engine to bind the form posted data into the model and pass it to my method.
By calling "Create" operation you can save the record into SFDC (simple ha?).
DataBag is another way to pass data to the View from the Controller which is more dynamic and flexible, suitable for any additional data or instructions that need to be passed to the view other than the main object.
Below is the code that uses Magentrix's standard user interface library to build the hybrid app. The Magentrix standard components apply the CSS styles provided by the Magentrix theme for both classic and model devices.
<aspx:AspxPage runat="server" Id="MyNewPage" title="Feedback">
<body>
<aspx:ViewPanel runat="server" title="Feedback" ButtonsLocation="bottom" visible='<%# !Bool(DataBag.ShowConfirmation) %>'>
<action>
<aspx:CommandButton runat="server" Text="Submit"/>
</action>
<body>
<aspx:ViewSection runat="server" title="Personal Information" columns="one">
<aspx:InputField runat="server" value="{!Model.FirstName__c}" required="true"/>
<aspx:InputField runat="server" value="{!Model.LastName__c}" required="true"/>
<aspx:InputField runat="server" value="{!Model.Email__c}" required="true"/>
</aspx:ViewSection>
<aspx:ViewSection runat="server" title="Message" columns="one">
<aspx:InputField runat="server" value="{!Model.Message__c}" required="true"/>
</aspx:ViewSection>
</body>
</aspx:ViewPanel>
<aspx:ViewPanel runat="server" title="Feedback Confirmation" visible='<%# Bool(DataBag.ShowConfirmation) %>'>
<body>
<divclass="content-box">
<h2>Thank you for taking the time!</h2>
<div>
Your opinion matters the most to us, Thank you for help us by sharing your comments and suggestions.
</div>
</div>
</body>
</aspx:ViewPanel>
</body>
</aspx:AspxPage>
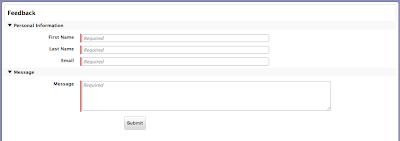
Anxious to see the results? The classical view would look like this:
And the mobile view would look like this:
