Salesforce Files simplifies document management within Salesforce, offering a central hub for storing, sharing, and collaborating on files. This article will guide you through the necessary steps to prepare the environment and configure Salesforce Files in Magentrix, as well as how to troubleshoot any issues you may encounter.
Requirements:
The new configuration was implemented following release 1.49.
- Create a Permission Set to enable the "Query All Files" permission on the profile of the integration user.
- The Portal URL must be configured beforehand in the Remote Site Settings. We recommend using the Internal URL, as it is permanently set. The URL can be found in the setup menu of your Magentrix portal > System Settings > Application Paths section.
- In Salesforce Setup > Search for Remote Site Settings.
- Click New Remote Site, and fill out the required fields:
Remote Site Name: Enter the Name of your Magentrix Portal
Remote Site URL: Enter your Magentrix instance URL e.g. "https://example.magentrixcloud.com"
Active: Ensure the checkbox is enabled
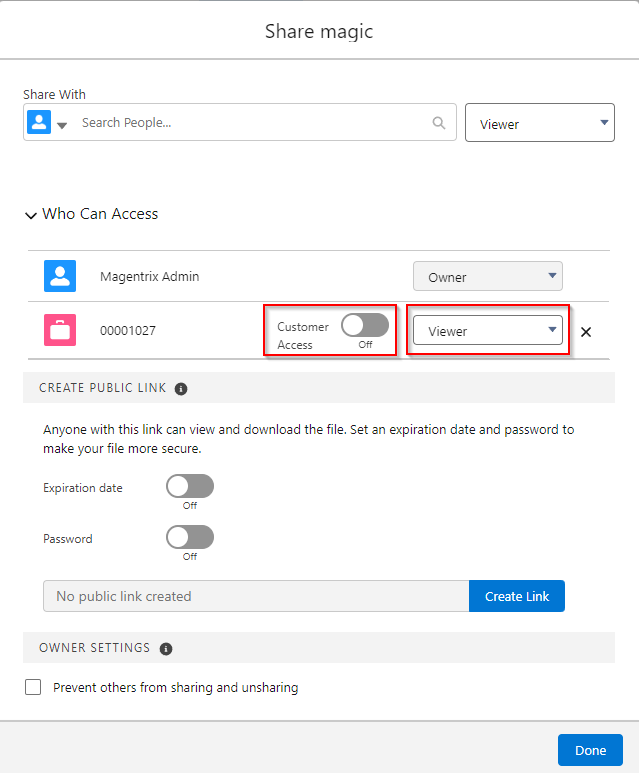
Key Terms in the Salesforce File Sharing Menu:
Set by Record: This sharing setting allows access to files based on the record-level sharing settings in Salesforce. It means that the file inherits its visibility and access permissions from the record it's associated with. For example, if a file is attached to an opportunity record and the opportunity is only visible to certain users or roles, then the file will also only be visible to those same users or roles.
Viewer: This sharing setting grants access to users who are explicitly specified as viewers of the file. It allows you to manually select and grant access to specific users or groups, regardless of the record-level sharing settings. Users designated as viewers can view and interact with the file even if they don't have access to the associated record.
Customer Access: Allow external users, like customers or partners, to access files associated with specific records. It extends file-sharing capabilities to non-Salesforce users, enabling collaboration with external stakeholders.
There are two types of configurations, determined by whether the "Public Access Only" option is checked or not.
The "Public Access Only" setting in Salesforce Files controls whether a file is accessible to the public via a link or restricted to internal users based on sharing rules.
This setting can be found under the Files Settings of the MagentrixCommunitySettings Visualforce page, which becomes available after the package installation.

Salesforce Sharing Menu
Configuration 1: Public Access Only is unchecked
Files with “Access” set to Viewer, regardless of their Customer Access status (either 'Enabled' or 'Disabled'), will be synchronized with Magentrix.
Scenarios | Access | Customer Access | Will be synced with Magentrix |
1 | Viewer | Disabled | YES |
2 | Viewer | Enabled | YES |
3 | Set by Record | Disabled | NO |
4 | Set by Record | Enabled | NO |
Configuration 2: Public Access Only is checked
Files marked with the "Customer Access" enabled, regardless of their assigned permission status (either 'Viewer' or 'Set by Record'), will be synchronized with Magentrix.
Scenarios | Access | Customer Access | Will be synced with Magentrix |
1 | Viewer | Enabled | YES |
2 | Set by Record | Enabled | YES |
3 | Viewer | Disabled | NO |
4 | Set by Record | Disabled | NO |
How to Sync Salesforce Files with Magentrix
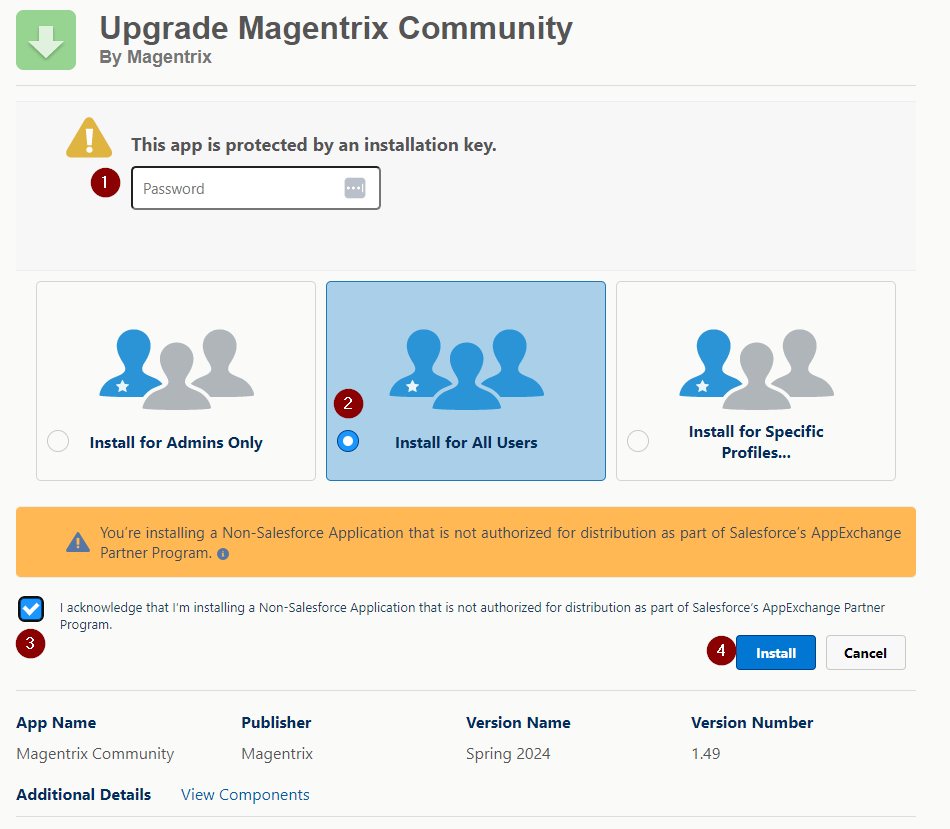
How to install the Community Package
- Please contact the Magentrix support team to receive the package link and password.
- Provide the password.
- Select the "Install for All Users" option.
- Accept the conditions.
- Click the "Install" button.
How to access the Magentrix Community Settings
- In your Salesforce instance, navigate to Setup
- Search for Visualforce Pages
- Click on the MagentrixCommunitySettings page and click Preview
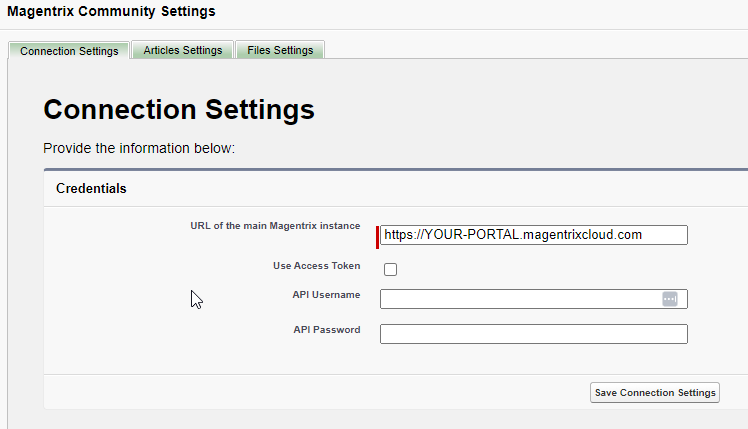
Connection Settings
- Provide the URL of your Magentrix instance. The URL can be found in the setup menu of your Magentrix portal > System Settings > Application Paths section.
- Select your preferred connection method: Credentials or Access Token.
- Credentials: insert the Username and Password of an Administrator of your portal.
- Access Token: Refer to the “Using Access Tokens” documentation to generate your token. After creating the token, return to the settings and check the "Use Access Token" checkbox. Then, insert the generated Access Token.
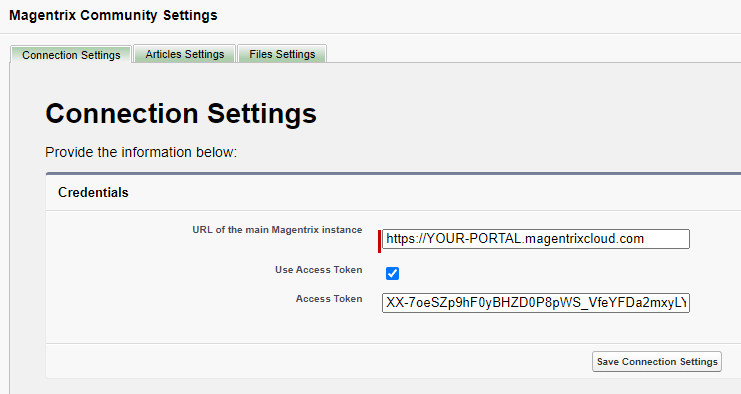
- Click the Save Connection Settings button.
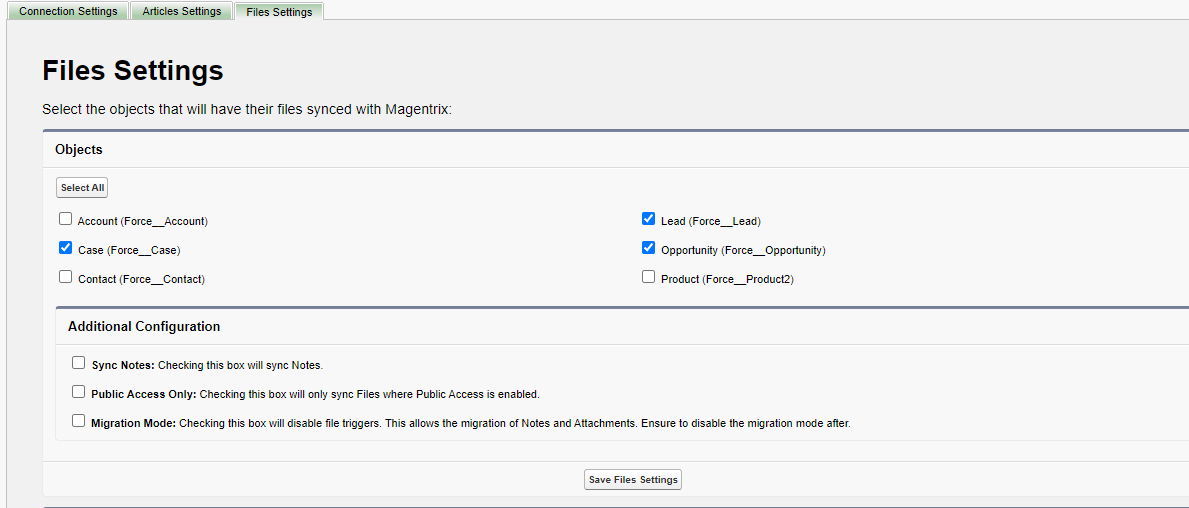
Files Settings
If you are currently using Attachments instead of Files and wish to migrate, please refer to this
documentation.
- Select the objects whose files will be synced with Magentrix:
Further Configuration Details and Additional Information
- Sync Notes: Check this box to synchronize Notes.
- Public Access Only: Check this box to synchronize only Files with Public Access enabled.
- Migration Mode: Check this box to disable file triggers, allowing the migration of Notes and Attachments. Ensure that migration mode is disabled afterward.
- Click the 'Save Files Settings' button.
- After editing the Files Settings, if you want to sync historical files to the Portal, you must click the 'Sync Salesforce Files' button.
This procedure will update files according to the settings. It will take some time depending on the number of files you already have. When the process is finished, you will receive a confirmation email.
Note: To perform this action, you need to enable the following permission on your Profile: 'Query All Files'."
How to Identify Entities with Files in Their Records
- In Salesforce, click on the gear icon.
- Select "Developer Console" from the dropdown menu.
- Click on the "Query Editor" tab.
- Paste the following query:
SELECT LinkedEntityId, COUNT(Id) FROM ContentDocumentLink GROUP BY LinkedEntityId
- Click "Execute" located at the bottom left.

- From the resulting output, translate based on the following prefixes:
- "005" corresponds to the "User" entity.
- "500" corresponds to the "Cases" entity.
Entity Key prefix decoder(Official)
Salesforce Entity Key Prefixes(Complete)
How to Identify File Titles for a Specific Entity
SELECT ContentDocument.Title FROM ContentDocumentLink WHERE LinkedEntityId = '500ak00000APElBAAX'
Replace '500ak00000APElBAAX' with the ID of the entity in Salesforce.
Integrating the Files Entity and Related Lists
How to Import the File Entity
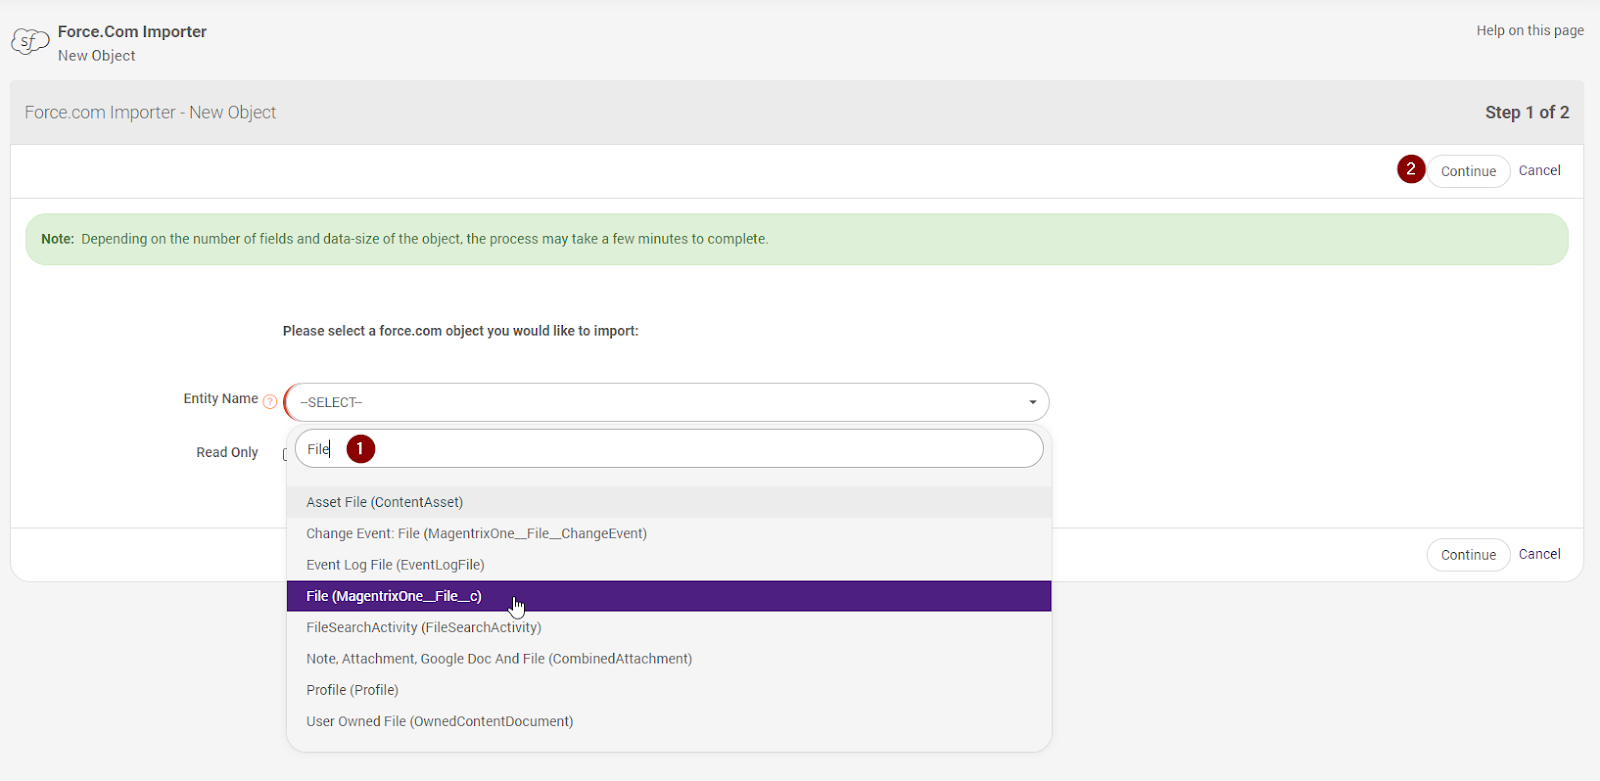
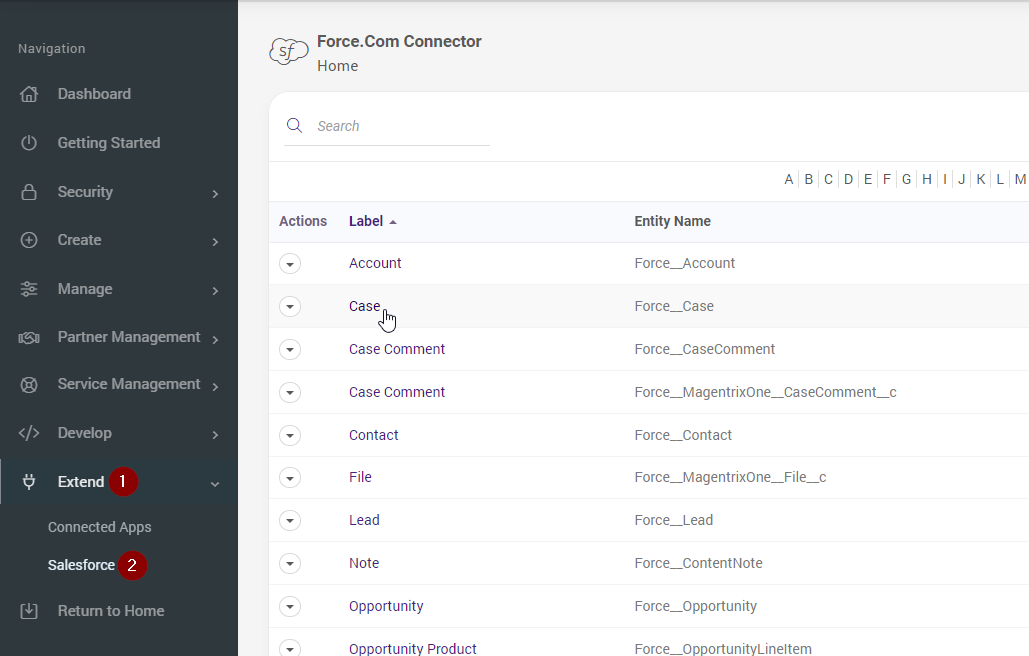
- In Magentrix, navigate to the Setup menu > Extend > Salesforce > New
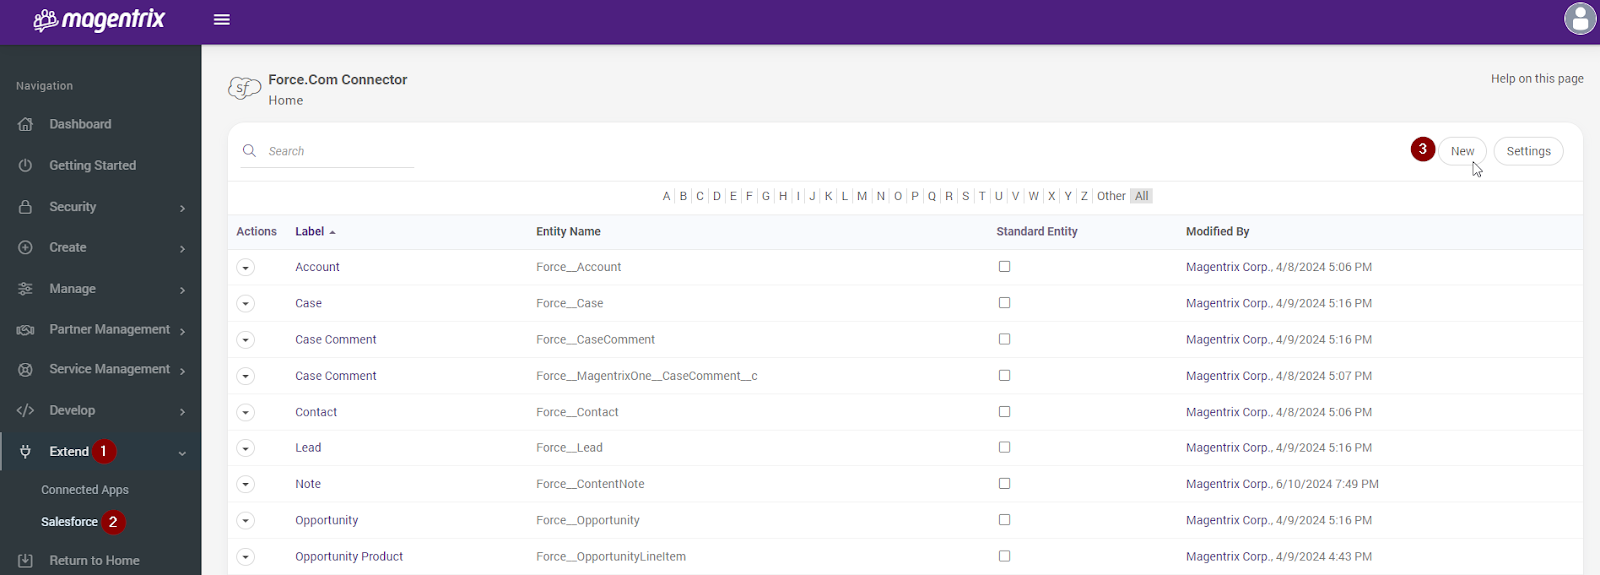
- Search for File (MagentrixOne__File__c) and click on “Continue”.
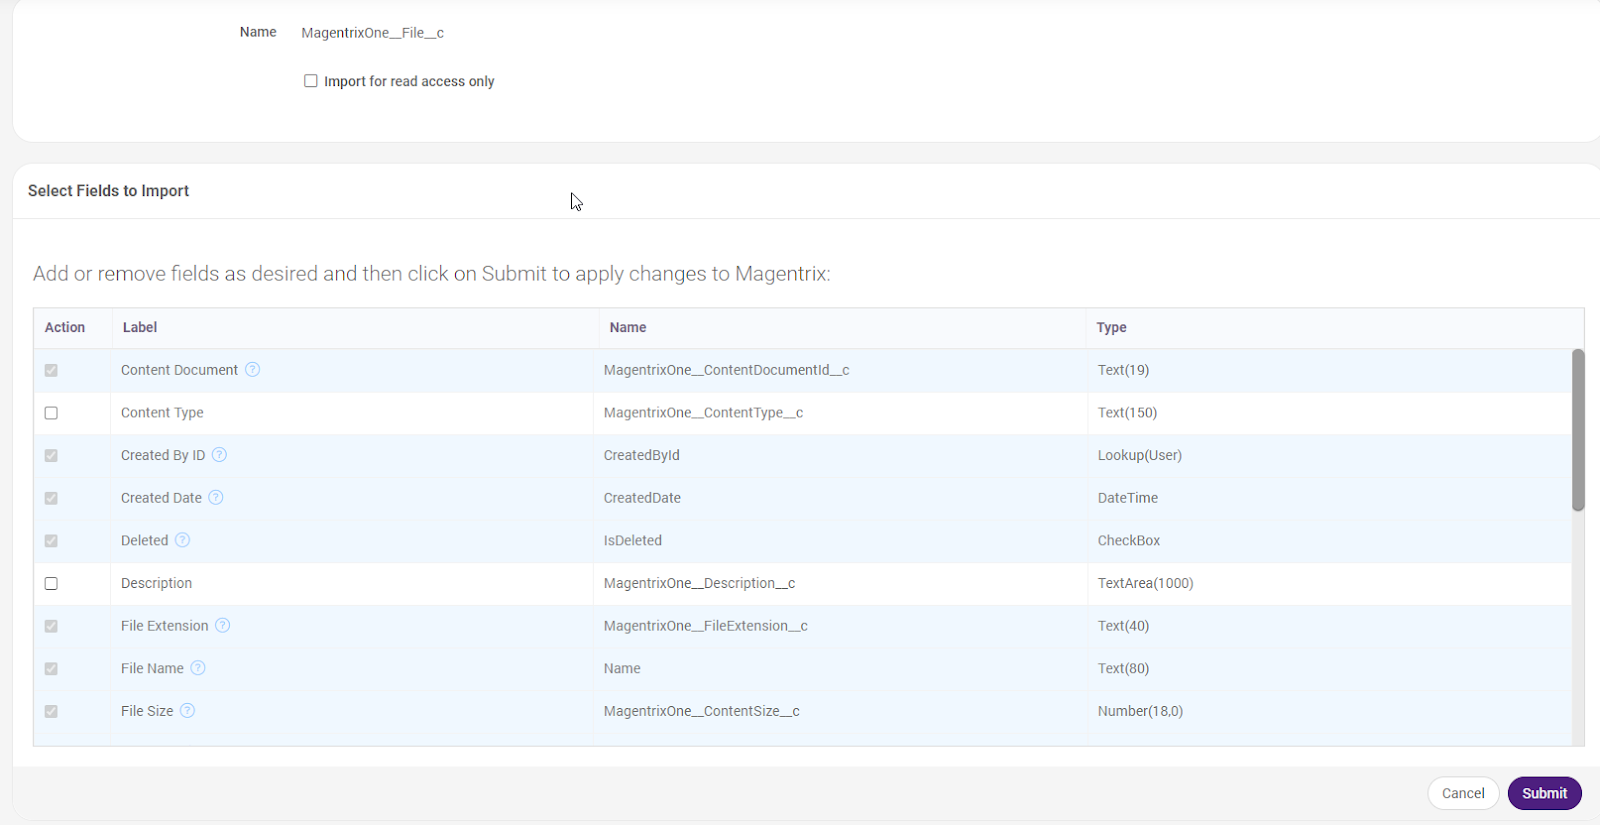
- At this step, all the required fields are already selected. If you wish to use the optional ones, select them and click “Submit”.
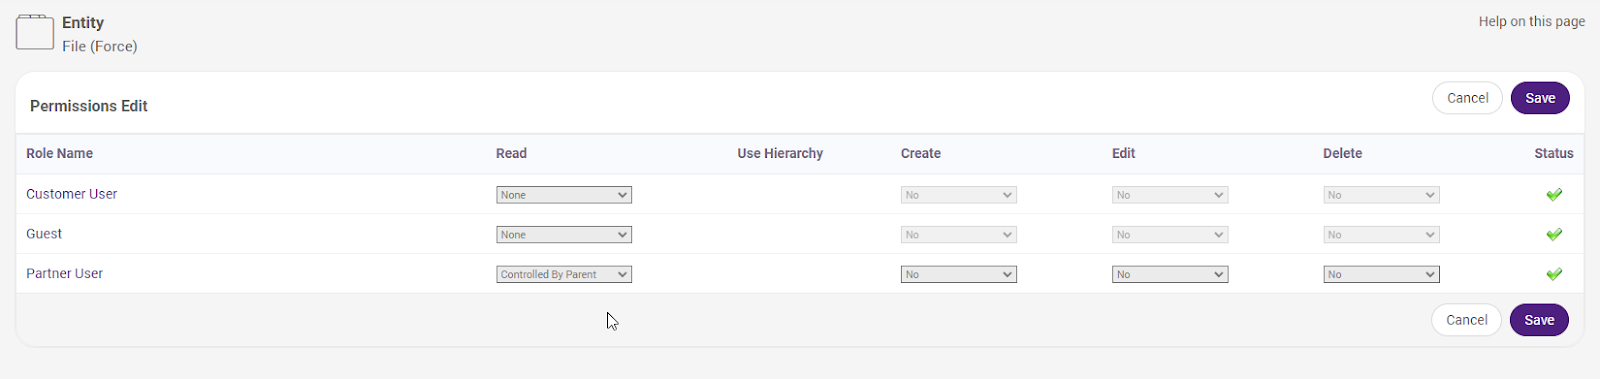
- Set the permissions for each role, and click Save.
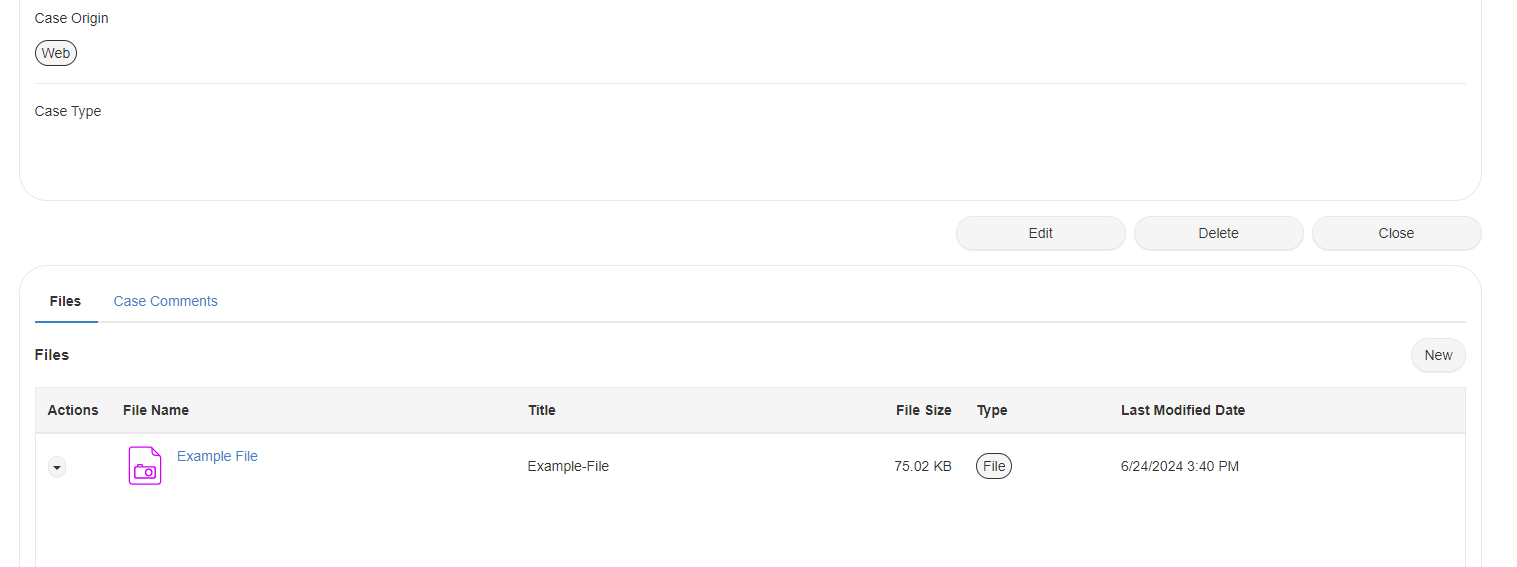
How to Add the Files Related List
- In Magentrix, navigate to the Setup menu > Extend > Salesforce, and click on the entity to which you want to add the related list.
- Click on the Page Layouts tab, then click on the layout.
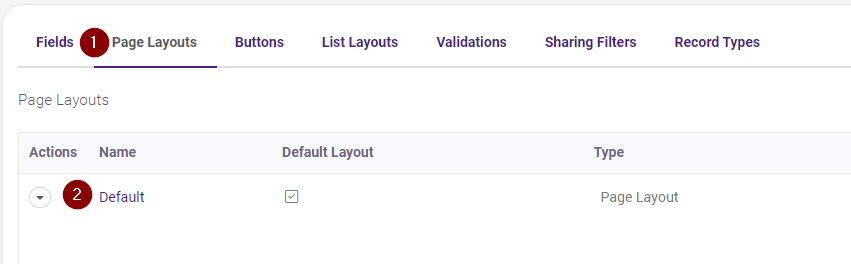
- Click on the Page Layouts tab and select the layout.
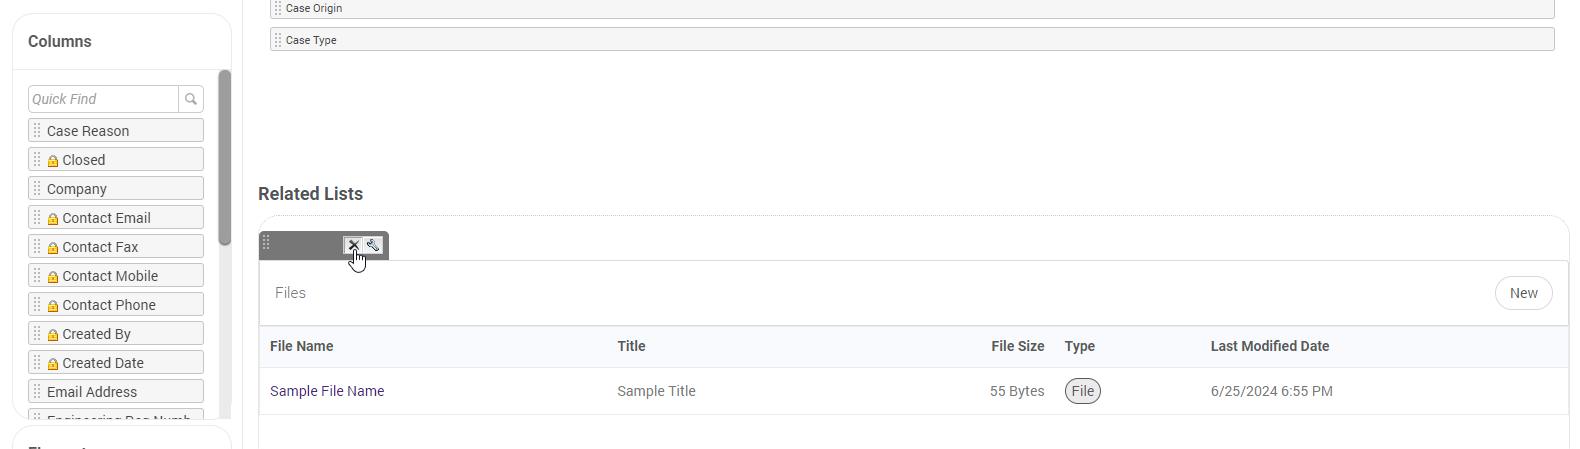
- In the Layout Designer, click on Related Lists in the left-side menu. Then, drag the Files Related List and drop it into the Related Lists section.
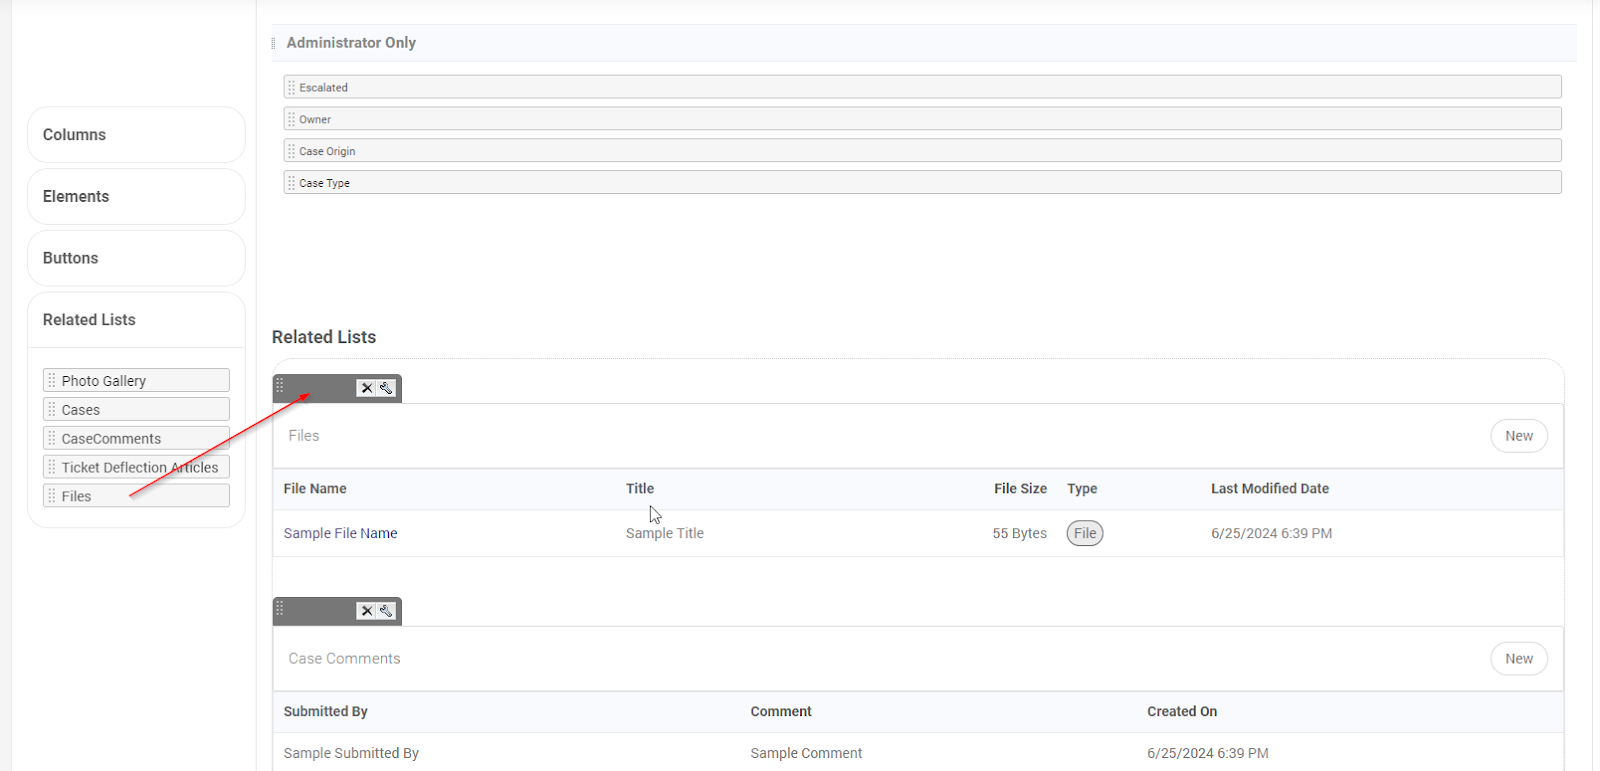
If the Files Related List is not available, please
refresh the Entity to which you are adding the Related List. (e.g. Cases).
- Click on Save & Close.
- Navigate to a Record to check the Related List.
Error: Invalid request, relation field is incorrect
This error occurs when the relationship between an entity and the Files entity has been broken.
To resolve this issue, please follow these steps:
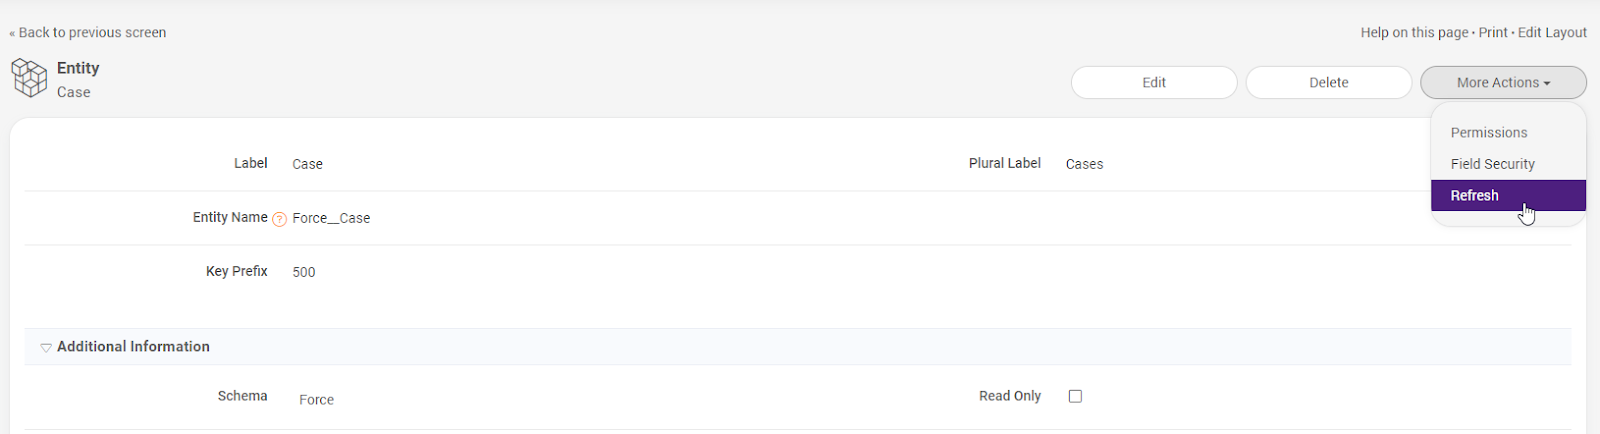
- In Magentrix, navigate to the Setup menu > Extend > Salesforce > Click on the Entity where this issue occurred.
- Click on the Page Layouts tab and select the layout.
- Click on the X icon in the Files related list to remove it > Click Save & Close.
- Back in the Entity, click on More Actions > Refresh > Submit.
A refresh of an entity will trigger the reimport of all records, so we recommend it to be done outside of working hours, if the entity has more than 20 thousand records.
- Once the refresh is complete, navigate to the Salesforce entity > Page Layouts tab > add the related list again > Save & Close.